# Introduction
Welcome to Growlytics developers documentation. This website will help you to understand and integrate Growlytics to your website.
Growlytics provides SDKs and a number of REST API endpoints, to support product related features.
## Terminology
Events, users, segments, campaigns, journeys and reports are central to the Growlytics platform, so it is important to for you to understand each one's role.
* **Customers/Users:** After installing Growlytics SDK, a customer profile will be created for each person who visits your website or opens your mobile app. Growlytics customer profile comes with default fields like location, device details, total visits, etc. You can also add custom fields to custom profiles using the SDK. You can read SDK references for adding custom fields to customer's profiles.
* **Events:** Growlytics automatically captures page visits, click and input events for you. Moreover, Growlytics SDK lets you track what actions users perform in your app or website, such as a viewed product category, listening to a song, or making a purchase. Events are associated with both a customer profile and a customer's session.
* **Sessions:** Each website visit or app launch will be marked as a session. Events triggered within 30 minutes of each other are counted towards the current session. The time of the first event marks the start time of a session and the last event triggered marks the end time of a session.
* **Segments:** With Growlytics you can create segments, which are a group of customers whose behaviors, activities, or profile properties meet a set of filters you’ve defined. Once you’ve identified segments, you can save them, target them with event analytics and also engage with them by campaigns, and then analyze them over time.
* **Campaigns:** With Growlytics, you create campaigns on different channels like Email, Push notifications etc. to communicate with your customers at scale. Growlytics provides wide variety of trigger points to make sure you are engaging with customers with right message at right time.
* **Reporting:** Growlytics lets you build reports to understand the impact of your product events or campaigns. You can use these reports to analyze your user engagement and guide product decisions.
# Core Concepts
# Events
Every time an action happens that you wish to keep track of, you send an Event to Growlytics. Events can be as easy as choosing the text string that defines them.
## Event Basics
Every time an action happens that you wish to keep track of, you send an Event to Growlytics. Events can be as easy as choosing the text string that defines them.\
For example, you could send an “Play Song” event every time a user presses the Song button, which play that song.
By tracking events in your app, you can better understand what users are doing. In Growlytics, you can analyze these events in many different ways, such as getting aggregating metrics of a specific event or measuring how a specific event type trends over time. You can also engage with your users based on these events by creating campaigns in Growlytics that are triggered by them.
### What events will Growlytics keep track of?
Growlytics auto captures all page visits, clicks and input events out of the box for you. Growlytics also gives you the power to determine what’s important to your experience. You can choose to track anything and everything.
For example, you could keep track of registration trends, most popular genres and songs, the music control buttons the users presses or even how many songs each user has listened to in each session etc.
## Tracking Types
There are two types of events in Growlytics: System Events and Custom Events.
System Events are events recorded automatically after you integrate our SDK. Custom Events are events you define and track with SDK or API.
## **Event Properties**
For each event, you can keep details of that event with event properties.
For example, while tracking the “Product viewed” event, you can save event properties like product name, category, and price. Tracking event properties will help you answer questions like which category of products are more popular, and help you segment customers based on which categories or price points they’ve viewed.
### Tracking event with properties
Let's suppose we want to track an event "Product Viewed" when a customer views a product. To track this event with the Growlytics SDK, you can use the following code snippet.
{% tabs %}
{% tab title="Javascript" %}
```javascript
growlytics.events.track("Product viewed",{
'Product Name': 'Macbook Pro 2015',
'Category': 'Electronics',
'SubCategory': 'Laptops',
'Price': 139000,
'Brand': 'Apple',
'Timestamp': new Date()
});
```
{% endtab %}
{% endtabs %}
### Default Metadata Recorded Automatically
For every event that’s recorded, Growlytics records the following standard metadata:
* Information about the session for which event was tracked. All session attributes (visit session page to get the list) will be recorded against this event.
* Information about the customer who performed the event. All the attributes in customer profile, will be recorded against this event.
* Date and time when the event was recorded in UTC and customer's timezone both.
### Event Property - Data Types
Supported property data type are Date, Integer, Float, String and Boolean.
For each SDK, Growlytics properties based on data type of SDK's language. For each language, mapping of data type is given below.
{% tabs %}
{% tab title="Javascript" %}
`Number` will be mapped to `Integer`
`BigInt` will be mapped to `Integer`
`String` will be mapped to `String`
`Boolean` will be mapped to `Boolean`
`Date` will be mapped to `Date`
Rest of data types will be converted to `String` using JSON.stringify()
{% endtab %}
{% endtabs %}
## System Events
We have pre-defined several generic actions that users can perform while interacting with your app, website and campaigns. These actions are referred to as *System Event* and are automatically tracked for your platforms once you integrate them with your Growlytics account.
Here's a list of all the *System Events* that are automatically tracked for all your users post integration:
| Name on Dashboard | Description |
| ------------------ | ---------------------------------------------------------- |
| App Installed | When the app is installed and launched for the first time. |
| App Uninstalled | When app is uninstalled. |
| Customer Created | Whenever a new customer is identified in Growlytics. |
| App Launched | When the app is launched. |
| Form Submitted | Whenever a form is submitted by the customer |
| New Sessions | Whenever a customer starts a new session. |
| Page Visited | Whenever a customer visits any page. |
| Webpush Subscribed | Whenever a customer enables permissions for Webpush. |
## Platform Notes & Considerations
* The maximum number of User Event types per project is 500. While the number might seem limiting, if used along side properties can help you record a lot more User Event data than it seems. The volume of events submitted per account across those event types is practically unlimited.
* For each User Event recorded, the maximum number of Event Properties is limited to 100.
* Event property keys must be of type String and property values must be scalar values, i.e. String, Boolean, Integer, Float or a Date object.
* Prohibited characters: &, $, “, \\, %, >, <, !
* User Event keys are limited to 120 characters in length.
* User Event property values are limited to 512 characters in length.
# Sessions
User Sessions are series of events that are performed within a single visit or interaction with your application.
User Sessions are series of events that are performed within a single visit or interaction with your application. Growlytics SDKs automatically keeps track of session automatically for you. But if your are using our HTTP api for trackign event, you might need to pass session ids manually.

## Tracking Sessions
Every website visit or mobile app launch is marked as a session. So all the events taken during this session will be marked against this session. Session automatically expires if user is not taking any action within 30 minutes of time. Events triggered after 30 minutes of interactions will be grouped under another session.
## Default session metadata
By default, Growlytics captures the following session metadata
| Metadata Name | Metadata Description |
| -------------- | ----------------------------------------------------- |
| Landing Page | First page visited by user for given session. |
| Exit Page | Last page visited by user for given session |
| Traffic Source | Trafic source domain name(google, quora etc) |
| Timestamp | Start time of session |
| Duration | Session Duration, difference of first and last event. |
| City | City, extracted from IP address. |
| Region | Region, extracted from IP address. |
| Country | Country, extracted from IP address. |
# User/Customer Profile
Growlytics creates a customer profile for each person who launches your app or visits your website.

Customer profile comes with default fields, such as email, phone number, and language. You can also extend the default profile by adding custom fields through SDK that are useful for your business.
For example, if you are an e-commerce platform, you can create a custom profile field to track what total purchase a customer has made till now. Customer profile has a set of default fields, such as email, phone number, location, language. You can also extend the default user profile by adding custom fields that are specific to your business.
By adding more custom fields in the customer profile, you will have more chances to create segments for customers that have a specific profile property, and you can also run a campaign to engage with that segment. You can also use these fields inside campaign messages to create personalized messages.
## Customer Profile Data Model
Customer profile consists of following type of information.
* Identifiers: Each profile is given a unique id by Growlytics. You can also provide your platform's id to identify that particular customer, we call it system id(Your system's id).
* Properties: This is information stored about the customer. For example, this might include age, gender, device, and location. You can also extend the default customer profile by adding custom fields that are specific to your business.
## Platform Considerations & Notes
* In a Customer Profile, you can set a maximum number of 256 custom attribute keys
* User Profile attribute keys must be of type String and attribute values can be scalar values, i.e. String, Boolean, Integer, Float or a Date object or array.
* Attribute key names are limited to 120 characters in length.
* Scalar attribute values are limited to 512 characters in length.
# Shopify Integration
This page will give you detailed steps to integrate Growlytics on your shopify website.
### STEP 1: Install the Growlytics Shopify App
Before proceeding, make sure you are logged in to your Shopify store and have the required access to install apps.
Install the Growlytics Shopify public app from this [link](https://apps.shopify.com/growlytics-connector-1?st_source=autocomplete). Click on the 'Add App' button to review the permissions of the app, and subsequently click 'Install App'. You will be asked to accept $5 monthly app charges. Click on 'Accept' to continue installing the app.
### STEP 2: Provide the Growlytics API Key In the Shopify App
For this step, start from the video recording or look through the step-by-step instructions below.
{% embed url="" %}
1. Once you have installed the app, you will see the screen shown below. Click on the 'Connect Growlytics Account' button to continue.
2. Enter the API key and click on the 'Connect' button.
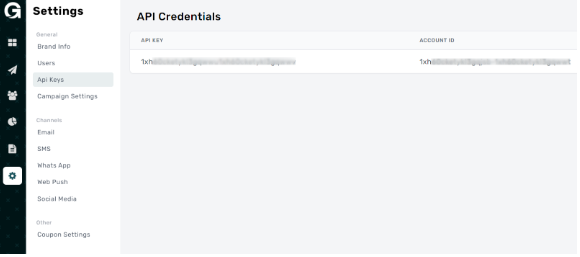
3. To generate the Growlytics API Key, login to your Growlytics Dashboard, click on Settings from the left side menu, and click on the API Keys' section. You will be redirected to the API Keys page.
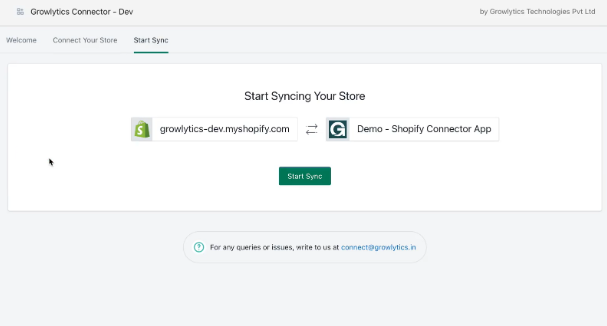
4. Verify the details of the store and Growlytics account being connected. Once verified, click on the '**Start Sync'** button. Once you start sync, the connector app will automatically start syncing all your customers, and past orders with your connected Growlytics account.
5. On your Shopify Dashboard, click on Online stores -> Customize -> Theme Settings -> App Embed -> Growlytics and enable the tab.
### STEP 3: Install additional scripts
After first step, you will need to add scripts in 3 different liquid template files: `theme.liquid`, `product.liquid`and `collection-template.liquid.`
1. Add the code below at the end of `theme.liquid` template file. This will allow Growlytics to analyze visitor's behaviour on your site:
```markup
```
{% hint style="warning" %}
1. Make sure you are replacing \ with your actual project api key. You can find api-key in project settings.
2. Make sure you are replacing \ with your shopify store name.
3. Make sure you are replacing the \ with your store's server location.
{% endhint %}
3\. Add the code below at the end of `product.liquid` template file. This will allow Growlytics to track products viewed by visitors.
```markup
```
4\. . Add the code below at the end of `collection-template.liquid` template file. This will allow Growlytics to track collections viewed by visitors.
```markup
```
# Browser SDK
# Integrate SDK
This page will give detailed description of how you can integrate Growlytics javascript SDK to your website.
## Step 1: Install SDK
Copy-paste the following code into \ of your application's root page. Make sure this script is added on all the pages of your website or web app.
```javascript
```
`growlyicsSettings` method supports following parameters.
| Option | Type | Description |
| ------- | ------- | ----------------------------------------------------------------------------- |
| apiKey | string | Api Key for given project. You can find the api key in project settings page. |
| enabled | boolean | Enable/disable growlytics sdk. |
## Step 3: Further Integrations
For further integrations, please refer to individual sections.
{% content-ref url="/pages/P4Mo0cNPfiRBHgnBha4P" %}
[Track Events](/integration/browser/installation-1)
{% endcontent-ref %}
{% content-ref url="/pages/-LIG-CFi-31xRcMDqK-O" %}
[Track Users](/integration/browser/identify-customers)
{% endcontent-ref %}
{% content-ref url="/pages/-LuffrfIaxapsz5VPhL-" %}
[Web Push Notifications](/channels/web-push-notifications)
{% endcontent-ref %}
# Track Events
This page will give detailed description of how you can integrate Growlytics javascript SDK to your website.
Let's suppose we want to track an event "Product Viewed" when a customer views a product. To track this event, you can use `Growlytics.events.track()` method.
With event name, you can pass custom JSON that you can later use for analytics and engagement purpose.
```javascript
Growlytics.events.track("Product viewed",{
'Product Name': 'Macbook Pro 2020',
'Category': 'Electronics',
'SubCategory': 'Laptops',
'Price': 139000,
'Brand': 'Apple'
});
```
{% hint style="warning" %}
Growlytics supports `Number, BigInt, String, Boolean` and `Date` data types for event property values. For further details refer to [event tracking considerations.](https://docs.growlytics.in/core-concepts-1/events#default-metadata-recorded-automatically)
{% endhint %}
# Track Users
In order to correlate sessions and errors with customer, or to see a list of customers with all session details, it is helpful to capture and display customer information on your Growlytics dashboard.
## Track User Attributes
Use `Growlytics.user.push` to add/update session customer attributes. For example, when customer selects city for checking out furniture, you can update city attribute of the customer even though they haven't logged in.
{% code title="index.js" %}
```javascript
Growlytics.user.push( {
city: 'San Francisco'
});
```
{% endcode %}
## User Login & Logout
{% hint style="info" %}
Ensure log in and log out of users are implemented correctly during the visit to your website and users are authenticated.
{% endhint %}
### Login User
Use `Growlytics.user.identify` method to associate user with Growlytics.
```javascript
Growlytics.user.identify('THE_USER_ID_IN_YOUR_APP', {
// Reserved customer properties (Used in campaigns)
name: 'John Wick',
email: 'john@gmail.com',
mobile: '9876543210',
// Custom properties
subscriptionType: 'pro',
region: 'Mumbai',
totalPurchaseTillNow: 30000
});
```
{% hint style="info" %}
name, email, and mobile are reserved keywords in the Growlytics platform. Growlytics will use these keywords to send emails, SMSes and more.
{% endhint %}
{% hint style="warning" %}
Customer id must be a string,(max 40 characters). Also, just like event tracking, Growlytics supports `Number, BigInt, String, Boolean` and `Date` data types for user attribute values. For further details refer to [event tracking considerations.](https://docs.growlytics.in/core-concepts-1/events#default-metadata-recorded-automatically)
{% endhint %}
## Log Out
Use this function to forcefully log out the current user.
```javascript
Growlytics.user.logout();
```
{% hint style="warning" %}
Make sure you do `logout()` before you use `Growlytics.identify(),` or else previously identified user's data may get updated.
{% endhint %}
# Configure Web Push
Visit Web Push channel configuration page for push notifications integration guidelines.
Visit [Web Push channel configuration page ](https://docs.growlytics.in/channels/web-push-notifications)for push notifications integration guidelines.
# Reading Session Identifer
This article explains how you can read session identifier to fire Growlytics events from your backend servers with Session Details.
If you are planning to add events from your backend application and if you want to associate that event with the Growlytics Session, this article will guide you on how you can achieve that.
## Passing Session Identifier to your server
The Session identifier is nothing but the device id of the customer that Growlytics maintains. You can use `Growlytics.getDeviceId()` to read the device id.
```javascript
let deviceId = Growlytics.getDeviceId();
```
{% hint style="warning" %}
Device Id is always associated with a single customer and its a permanent for the given browser/device. If in the same browser, if the user logs out and logs in as another user, then the device id will remain the same but it will be pointing to a newer user.
{% endhint %}
You can pass the device id received to your backend server and use it while adding an event to Growlytics from your backend.
# Syncing Cart Items
This article will help you to sync your customer's cart items with Growlytics.
With Growlytics browser SDK, you can sync customer's cart items and use it to personalize campaign messages like showing abandoned cart items or showing total cart amount etc.
Once cart items synced using Browser SDK, you can use those cart details inside Email, SMS, WhatsApp, and other campaigns.

## Sync Cart
To sync cart you can use`Growlytics.cart.sync()` method. This method excepts very specific input parameters that you will need to follow.
```javascript
// Sync Cart with Growlytics
Growlytics.cart.sync({
id: '---cart id of your system goes here--',
amount: 123, // Total cart amount goes here,
url: 'https://myapp.com/checkout/123324', // Abandoned Cart URL
items:[ // List of cart items
{
id: '--product id goes here--',
name: '--product name goes here--',
variant: '--product variant name goes here--',
image: '--product goes here--',
price: '--product price goes here',
originalPrice: '--product original price - to show discount in emails',
quantity: 2, // Number of products in cart
notes: '--notes to show with cart items in email--'
}
]
})
```
{% hint style="warning" %}
The input of the `sync()` method should exactly match with the structure mentioned above. Cart sync will fail otherwise.
{% endhint %}
### Cart Object
| Input Parameter | Required? | Type | Description |
| --------------- | --------- | ------- | -------------------------------------------------------------------------- |
| id | Yes | String | Cart id that you manage in your system. |
| amout | Yes | Decimal | Total Cart Amount |
| items | Yes | Array | List of all cart items. |
| url | Yes | String | Abandoned cart URL, to be mentioned on email, SMS, and WhatsApp campaigns. |
### Cart Item Object
| Input Parameter | Required? | Type | Description |
| --------------- | --------- | ------- | -------------------------------- |
| id | Yes | String | Id of the product added in cart. |
| name | Yes | String | Product Name |
| variant | Optional | String | Product variant name |
| image | Yes | String | Product Image Url |
| price | Yes | Decimal | Product Price |
| quantity | Yes | Number | Product quantity in cart. |
## Clear Cart
Once the purchase is made or cart items has expiry, its important to clear cart items from Growlytics. To clear cart use following sdk method.
```js
Growlytics.cart.clear();
```
# Android SDK (Coming Soon)
This section will provide you all the information required to manage event and user data on Growlytics Dashboard using Growlytics Android SDK.
# Install Android Sdk
This page will give detailed description of how you can integrate Growlytics android SDK to your native android app.
Use Growlytics Android SDK to track, analyze and engage user from native android apps.
Follow the guidelines to install the Growlytics Android SDK, track events, and see the event data within the Growlytics dashboard.
## Step 1: Add Growlytics SDK to your project
Add `growlytics-android-sdk` dependency to your project.
For enable FCM support, you will need to add follwoing dependencies in your application’s `build.gradle` file. You will also have to add the FCM generated google-services.json file to your project.
{% tabs %}
{% tab title="build.grdle" %}
```gradle
{
dependencies {
implementation 'com.growlytics.android.sdk:growlytic-android-sdk:1.0.4'
implementation 'com.google.firebase:firebase-messaging:17.3.3'
implementation 'com.google.android.gms:play-services-base:16.0.1'
implementation 'com.android.support:support-v4:28.0.0'
}
// at the end of the build.gradle file
apply plugin: 'com.google.gms.google-services'
}
```
{% endtab %}
{% endtabs %}
Once you have added dependencies on your `build.gradle` file, sync your project by clicking on `Tools > Android > Sync Project With Gradle Files` button.
## Step 2: Configure Growlytics credentials in AndroidManifest.xml
To send data to your Growlytics account, you will need to add your Growlytics account's credentials in the `AndroidManifest.xml` file in your application.
As shown in snippet below, add your Growlytics project id and api key to your `AndroidManifest.xml`, within the tags.
{% tabs %}
{% tab title="AndroidManifest.xml" %}
```markup
```
{% endtab %}
{% endtabs %}
## Step 3: Add required permissions in AndroidManifest.xml
At the root of your manifest file inside \ file, add following permissions.
{% tabs %}
{% tab title="AndroidManifest.xml" %}
```markup
```
{% endtab %}
{% endtabs %}
## Step 4: Enable Tracking by Adding Permissions
In your AndroidManifest.xml file, add the following snippet within the tags.
```java
```
{% hint style="warning" %}
Make sure you have specified `android:name` as `com.growlytics.android.sdk.Application.`
{% endhint %}
## Step 5: Build & Run Your Application
Build and run your application.
Open your Growlytics dashboard. Goto People > Customers. If you successfully integrated the Growlytics SDK, you will see a new customer there.
## Step 6: Setup Event Tracking
An Event is an action that user takes in your mobile or web app. Growlytics records the event on the User Profile, using an Event Name and optional associated key:value-based Event Properties. You can then segment users, target and personalize messaging based on both the Event Name and specific Event Properties.
```java
// Prepare Attributes
Map eventDetails = new HashMap<>();
eventDetails.put("Product Name", "Mens Polo T-shirt with Collor, Yellow");
eventDetails.put("Category", "Mens Accessories");
eventDetails.put("Sub Category", "Polo T-shirts");
eventDetails.put("Price", 999.99);
eventDetails.put("Date", new java.util.Date());
// Put them in growlytics user profile
Analytics.getInstance(this).track("Product Viewed", eventDetails);
```
## Step 7: User Profile Information
A User is automatically created in Growlytics platrorm when user opens the app first time.
Initially, there are very few properties captured for User Profile like city, country, device info etc. Depending on your product purpose, You can add more information to user profile with `Analytics.identify()` method.
There are two ways you can do this
1. If your customer has logged in with your system's user id, then you can pass customer's id which is in your system. This will help you keeping unified profile across web, mobile and other platforms. An example is given below.
```java
// Prepare Attributes
Map userAttributes = new HashMap<>();
attributes.put("has_subscribed", true);
attributes.put("total_cart_visits", 12);
// Put them in growlytics user profile
Analytics.getInstance(this).identify(userAttributes);
```
2. Another way, if user has not logged in yet but you still want to keep information as anonymous user, you can do that as well. An example is given below.
```java
// Prepare Attributes
Map userAttributes = new HashMap<>();
attributes.put("has_subscribed", true);
attributes.put("total_cart_visits", 12);
// Put them in growlytics user profile
Analytics.getInstance(this).identify(userAttributes);
```
# Identify Customers
This page will help you understand how you can manage customer profiles on Growlytics using Android sdk.
A User is automatically created in Growlytics platrorm when user opens the app first time.
Initially, there are very few properties captured for User Profile like city, country, device info etc. Depending on your product purpose, You can add more information to user profile with `Analytics.identify()` method.
There are two ways you can do this
1. If your customer has logged in with your system's user id, then you can pass customer's id which is in your system. This will help you keeping unified profile across web, mobile and other platforms. An example is given below.
```java
// Prepare Attributes
Map userAttributes = new HashMap<>();
attributes.put("has_subscribed", true);
attributes.put("total_cart_visits", 12);
// Put them in growlytics user profile
Analytics.getInstance(this).identify(userAttributes);
```
2. Another way, if user has not logged in yet but you still want to keep information as anonymous user, you can do that as well. An example is given below.
```java
// Prepare Attributes
Map userAttributes = new HashMap<>();
attributes.put("has_subscribed", true);
attributes.put("total_cart_visits", 12);
// Put them in growlytics user profile
Analytics.getInstance(this).identify(userAttributes);
```
# Push Notification Integration
Visit Mobile Push channel configuration page for push notifications integration guidelines.
In order to send notifications to your mobile users using Growlytics platform, you will need to add FCM messaging listeners to your apps.
### Step 1: Register FCM Messaging Service
Register an Growlytics' FCM messaging service in android manifest file as mentioned in example below. If you have already registered FCM messaging service, you can call Growlytics's `updateFCMToken()` and `updateFCMToken()` methods.
{% tabs %}
{% tab title="Growlytics FCM Service" %}
{% code title="AndroidManifest.xml" %}
```markup
// Skip adding this if you have already added in previous step
```
{% endcode %}
{% endtab %}
{% tab title="If you have already implemented FCM Messaging Service " %}
{% code title="FcmMessagingService.java" %}
```java
@Override
public void onNewToken(String s) {
super.onNewToken(s);
// Call Growlytics's updateFCMToken() method
com.growlytics.android.sdk.FcmMessagingService.updateFCMToken(
token,
getApplicationContext()
);
}
@Override
public void onMessageReceived(RemoteMessage message) {
super.onMessageReceived(message);
// Call Growlytics's updateFCMToken() method
com.growlytics.android.sdk.FcmMessagingService.onMessageReceived(
message,
getApplicationContext()
);
}
```
{% endcode %}
{% endtab %}
{% endtabs %}
### Step 2: Register Broadcast Receiver
In order to receive notifications in background, add a receiver as mentioned in example below. If you have already registered FCM messaging service, you can call Growlytics's `onNotificationReceived()`method.
{% tabs %}
{% tab title="Add Growlytics Broadcast Receiver" %}
{% code title="AndroidManifest.xml" %}
```markup
```
{% endcode %}
{% endtab %}
{% tab title="If you have already implemented Broadcast receiver" %}
{% code title="PushNotificationReceiver.java" %}
```java
public class GrwPushNotificationReceiver extends BroadcastReceiver {
@Override
public void onReceive(Context context, Intent intent) {
// Call Growlytics's updateFCMToken() method
com.growlytics.android.sdk.GrwPushNotificationReceiver.onReceive(
context,
intent
);
}
}
```
{% endcode %}
{% endtab %}
{% endtabs %}
### Step 3: Configure FCM credentials
Visit Mobile [Push channel configuration page ](https://docs.growlytics.in/channels/mobile-push-notifications)for configuring FCM credentials.
### Additional Notes
Structure of the payload with a Growlytics FCM push notification.
| Key | Data Type | Description |
| ------------ | --------- | ------------------------------------------------------------------------------------------------------------------------------------------------ |
| glytcs\_pnf | boolean | If this field is present, means notification is received from Growlytics. |
| glytcs\_id | string | Notification tracking id used by Growlytics. |
| glytcs\_img | string | Url of an notification Image. If given, this URL will be used to show large image in notification. |
| glytcs\_tl | string | Notification title, must be present or app name will be used as title. |
| glytcs\_msg | string | Notification body, must be present, if not provided, notification will not be shown. |
| glytcs\_chnl | String | Notification channel id, must be present and channel must be created by app, if given channel not registered, notification will not be rendered. |
| glytcs\_dl | string | If present, this is a deep link that must be followed at the time of notification open. |
| glytcs\_sbt | string | Notification sub-title, will be displayed next to app name in notification. |
| glytcs\_clr | string | Color for small icon in notification. It Must be in hex or else color will be ignored. |
| glytcs\_pr | string | Priority for push notification \[Low, High, Max] |
| glytcs\_dnr | boolean | If present, notification will not be shown, it will be ignore |
# iOS SDK
This section will provide you all the information required to manage event and user data on Growlytics Dashboard using Growlytics iOS SDK.
Here are the articles in this section:
{% content-ref url="/pages/-M2JCPYRf78C-woVRy\_C" %}
[Install iOS Sdk](/integration/ios-sdk/install-ios-sdk)
{% endcontent-ref %}
{% content-ref url="/pages/-M2IyQJbSZi\_-pLvd3we" %}
[Tracking User](/integration/ios-sdk/tracking-user)
{% endcontent-ref %}
{% content-ref url="/pages/-M2JAE4XByndgmtFGdMy" %}
[Tracking Events](/integration/ios-sdk/tracking-events)
{% endcontent-ref %}
{% content-ref url="/pages/xTIkGFO9uXRjCRlSjU3D" %}
[Configure Mobile App For Push](/integration/ios-sdk/push-notification-settings/configure-mobile-app-for-push)
{% endcontent-ref %}
# Install iOS Sdk
This page will give detailed description of how you can integrate Growlytics iOS SDK to your native iOS app.
## Step1: Install SDK - With Swift Package Manager
The easiest way to use Growlytics in your iOS project is with Swift Package Manager.
Swift Package Manager (SPM) is a tool for managing the distribution of Swift code. It’s integrated with the Swift build system to automate the process of downloading, compiling, and linking dependencies.
To install the Growlytics iOS SDK with Swift Package Manager, follow the below steps:
1. Navigate to File -> Add Package
2. Enter the URL [ ](https://github.com/moengage/MoEngage-iOS-SDK.git)and select the branch as main or required version to install the package.
3. Click on Add Package.
4. Now, growlytics-ios-sdk is installed.
## Step2: Initialize SDK
**Step 1:** Call Growlytics `application:didFinishLaunchingWithOptions:` from the `application:didFinishLaunchingWithOptions:` of your `AppDelegate`.
* We recommended that you make this call at the end of `didFinishLaunchingWithOptions:`.
{% tabs %}
{% tab title="Swift" %}
```swift
import Growlytics
@UIApplicationMain
class AppDelegate: UIResponder, UIApplicationDelegate {
func application(_ application: UIApplication, didFinishLaunchingWithOptions launchOptions: [UIApplicationLaunchOptionsKey: Any]?) -> Bool {
/**
YOUR CODE GOES HERE
**/
LifeCycleCallback.shared.register(application: application)
return true
}
```
{% endtab %}
{% endtabs %}
## Step3: Configure Info.plist
Add the following properties to the `Info.plist` file of your project.
Key
Type
Value
Description
GROWLYTICS_API_KEY
STRING
API - KEY
GROWLYTICS API KEY
GROWLYTICS_HOST
STRING
PROVIDED BY GROWLYTICS
ASKS GROWLYTICS SUPPORT TEAM FOR GROWLYTICS_HOST
GROWLYTICS_DISABLED
BOOLEAN
TRUE/FALSE
Enable/Disable Sdk.
{% hint style="info" %}
#### Congratulations!
You have successfully integrated the Growlytics SDK with your iOS app and are sending user session and [system events](https://docs.webengage.com/docs/ios-tracking-events#section-system-events) data to your Growlytics account. Please note that it may take a up to few minutes for your data to reflect on your dashboard.
{% endhint %}
## What Next?
With Step3, Growlytics SDK integration is finished.
We recommend that you implement the following integrations before releasing your app with Growlytics SDK for the first time:
{% content-ref url="/pages/-M2JAE4XByndgmtFGdMy" %}
[Tracking Events](/integration/ios-sdk/tracking-events)
{% endcontent-ref %}
{% content-ref url="/pages/-M2IyQJbSZi\_-pLvd3we" %}
[Tracking User](/integration/ios-sdk/tracking-user)
{% endcontent-ref %}
# Tracking User
Growlytics ios SDK starts tracking users as soon as the app launches. Each time user installs app and opens for first time, Growlytics SDK automatically creates an anonymous customer for given device. All their behavioral data and session data *(*Events & Customer Attributes*)* are stored under the anonymous profile.
When customer logs-in or registers with your app's login options, all anonmous behaviour data captured earlier will be merged with logged in customer's behaviour data.
## Login Customer
Use `loginUser` method to create a customer profile in Growlytics and sync behavioral data with this identified customer. The login method accepts two parameters:
1. SystemId: This is the id that you use to identify customer in your system.
2. Customer Attributes: Custom attributes you want to track for given user.
{% tabs %}
{% tab title="Swift" %}
{% code fullWidth="true" %}
```swift
import Growlytics
class MyController: UIViewController {
func yourLoginFunction() {
/**
Your Login Logic
**/
// Build Customer Attributes To Pass To Growlytics.
let customerAttributes: [String:Any] = [
// Reserved customer properties (Used in campaigns)
name: 'John Wick',
email: 'john@gmail.com',
mobile: '9876543210',
// Custom properties
subscriptionType: 'pro',
region: 'Mumbai',
totalPurchaseTillNow: 30000
]
// Login User To Growlytics.
Analytics.getInstance().loginUser("Custome_ID", customerAttributes)
}
}
```
{% endcode %}
{% endtab %}
{% endtabs %}
Once `login` method is called:
1. The user is identified (they become *Known Users* in your dashboard).
2. A new, *Known User Profile* is created for them that contains all their data.
3. All their previous anonymous profiles are merged with the new *Known User Profile* to create a single unified view of your users. *(This means that data from their first visit to your website to their latest interactions can all be found under a single user profile!)*
Make sure you call `login` as soon as the user logs in to your application, or whenever earliest you are able to identify the user.
{% hint style="info" %}
#### How User Profiles are Merged When User is Identified (assigned a CUID by you)
Let's assume that *User A* visits your website a few times before signing up.
**User A visits your website on Day 1:** Growlytics assigns them an LUID and automatically creates an anonymous user profile containing all their data *(Anonymous Profile 1).*
**User A revisits your website on Day 3:** Growlytics assigns them an LUID and creates another anonymous profile to record all their data *(Anonymous Profile 2).*
**User A revisits your website on Day 7 and creates an account:** On account creation, you can choose to assign the user a CUID. This will lead to the creation of a new user profile.
* As soon as the *Known User Profile* is created, Growlytics will run a quick check in it's backend to identify all the existing anonymous user profiles of the user that were created on their previous visits.
* In this case, *Anonymous Profile 1* and *Anonymous Profile 2* will be merged with the final profile of *User A* to provide a unified view of their preferences and behavioral history.
{% endhint %}
## Logout Customer
Make sure you call `logout` when the logged-in user logs out, or you do not want to attach any future event, session or user data with this user, until `login` is called again.
{% tabs %}
{% tab title="Swift" %}
```swift
import Growlytics
class MyController: UIViewController {
func yourLogoutFunction() {
/**
Your Logout Logic
**/
// Logout User From Growlytics.
Analytics.getInstance().logoutUser()
}
}
```
{% endtab %}
{% tab title="Second Tab" %}
{% endtab %}
{% endtabs %}
## Guidelines
* An ID can have of maximum 100 characters.
* A user ID cannot be changed once it has been assigned.
* Although ID can be any `String` that uniquely identifies users in your system, we recommend using system-generated user IDs from your database instead of information that can change over time such as email addresses, usernames, or phone numbers.
# Tracking Events
Growlytics starts tracking some events as soon as you [integrate the SDK](/integration/ios-sdk/install-ios-sdk). These are called *System Events* and track some generic user interactions with your app and campaigns. [Here's a list of the *System Events*](/core-concepts-1/events) that are automatically tracked by us.
You can create *Custom Events* to track any other user interactions that are crucial for your business. Each *Custom Event* can further be defined by Event Attributes like price, quantity, category, etc. Such granular data enables you to engage users through highly contextual and personalized campaigns through all engagement channels.
## Tracking Custom Events
Here's how you can track custom events in Growlytics iOS SDK.
{% tabs %}
{% tab title="Swift" %}
```swift
import Growlytics
class MyController: UIViewController {
func myfunction() {
/**
Your Login Logic
**/
let eventAttributes: [String:Any] = [
"Product ID": 1337,
"Price": 39.80,
"Quantity": 1,
"Product": "Givenchy Pour Homme Cologne",
"Category": "Fragrance",
"Currency": "USD",
"Is Premium": true
]
Analytics.getInstance().track("Product Purchased", eventAttributes)
}
}
```
{% endtab %}
{% endtabs %}
## Guidelines
Here are a few things to keep in mind:
* Growlytics sends all events data periodically in batches to minimize network usage and maximize mobile battery life for your users.
* *Custom Event* and *Custom Event Attribute* names are case sensitive and must be less than 50 characters long. `String` attribute values must be less than 1000 characters long.
* You can create a maximum of 25 *Event Attributes* of each data type for a *Custom Event.*
* The first datapoint synced to Growlytics defines the data type for that event attribute. Thus, data types must be consistent with the value that you want to store against the attribute. If the data type is changed at a later date, then *Custom Event Attribute* data will stop flowing to your Growlytics dashboard.
# Push Notification Settings
Push Notifications are a great way to keep your users engaged and informed about your app. You can reach your app users quickly and effectively. This guide will help you through the setup process for using Growlytics SDK to send push notifications.
# Configure APNS In Growlytics
To send Push Notifications, Growlytics needs to have APNS credentials generated on your Apple Developer Account. Use following guide lines to cnofiure APNS credentials in Growlytics dashboard.
## APNS Authentication Key
APNS Auth keys are the recommended method to enable sending push notifications to your app installed on iOS devices. To send push notifications to iOS users, it is required to generate the APNs Auth Key file for your application and upload it to the Growlytics dashboard.
## Step 1: Generate APNS Authentication Key
To create an APNS auth key, you will need to do the following:
1. Visit the Apple [Developer Member Center](https://idmsa.apple.com/IDMSWebAuth/signin?appIdKey=891bd3417a7776362562d2197f89480a8547b108fd934911bcbea0110d07f757\&path=%2Faccount%2F\&rv=1) and sign in with your credentials. You will need to create an apple developer account if you haven't already created earlier.
2. Select the Certificates, Identifiers & Profiles on the left pane.
3. On the certificates page, click on 'Keys' on the left pane as shown below.
Generate APNs Key From Apple Member Center
4. In the Keys page that opens, click on the '+' icon to create a new auth key.
5. In the 'Register a New Key' page that opens, enter the key name and choose the Apple Push Notifications Service (APNS) in the list available below.
6. Next, click on the Register Button. It will open the Download your Keys page.
7. Click on Download to download your Auth key file. Please note that you can download the auth key file only once. Copy the Key ID (highlighted in the image above) available on the download page. This is required to configure push notifications in the Growlytics dashboard. Once added, the Auth Key is listed under Keys as shown below.
8. Once added, the Auth Key is listed under Keys as shown below.
## Step 2: Configure APNS Key In Growlytics Dashboard
To create an APNS auth key, you will need to do the following:
1. Login to [Growlytics Dashboard](https://app.growlytics.in/login).
2. Go to Settings -> Mobile Push.
3. Click on **Configure iOS Push** button.
4. Fillup the Credentials form and click on save changes. Details for each form field is mentioned below:
1. **APNS Key File:** The APNS Authentication Key File that you have generated from Apple Developers Panel.
2. **Key ID:** Key ID is made available for the auth key that you had generated.
3. **Team ID:** To ge the Team ID details, login to your Apple Developer panel, go to Membership section, you will see TEAM ID mentioned there in that screen.
4. **Bundle ID:** You can find bundle id from your Xcode settings under "Signing & Capabilities" section.
Once configuration complete, next step is to set required sdk changes in your mobile app.
# Configure Mobile App For Push
In order for Growlytics to handle push notifications, following configuration/changes needs to be done in your mobile app:
## Step 1: Add/Configure App Target
1. Turn ON App Groups in for your app target and enable one of the App group ids, in case if you don't have an App Group ID then create one. The name of your app group should be group.{your\_bundle\_id}.Growlytics.
2. Turn ON Background mode and set/enable Remote Notification.
3. Turn ON the Push Notifications capability for your app.
## Step2: Add UserNotifications framework
In the App's Target add **UserNotifications** framework in **Linked Frameworks and Libraries** and set it to **Do not embed**.
## Step2: Registering for Push notification
Make sure that class, where UserNotificationCenter delegate methods are implemented, should agree to UNUserNotificationCenterDelegate , also set the UNUserNotificationCenterDelegate after the app launch in `application:DidFinishLaunchingWithOptions:` as shown below.
```swift
import UIKit
import Growlytics
import UserNotifications
@QUIApplicationMain
class AppDelegate: UIResponder, UIApplicationDelegate, UNUserNotificationCenterDelegate {
var window: UIWindow?
func application(_ application: UIApplication, didFinishLaunchingWithOptions launchOptions:
[UIApplication.LaunchOptionsKey: Any]?) Bool {
// Request for notification permission.
// With this code, notificaiton permission popup will be shown at app launch.
// If you don't want to show popup at app launch, move this code block to where you want to request for push permissions.
UNUserNotificationCenter.current().delegate = self
let authOptions: UNAuthorizationOptions = [.alert, .badge, .sound]
UNUserNotificationCenter.current().requestAuthorization(options: authOptions, completionHandler: {_, _ in })
application.registerForRemoteNotifications()
// Register Growlytics SDK Callback Handler.
LifeCycleCallback.shared.register(application: application)
return true
}
}
```
## Step3: Configure AppDelegate swizzling in SDK
In Growlytics SDK we have swizzled the AppDelegate Class to get all the callbacks related to Push Notifications and also we have applied method swizzling for UserNotificationCenter delegate methods.
In case you prefer not to use swizzling, you can disable the same by adding the flag `GROWLYTICS_SWIZZLING` in the app’s Info.plist file and setting it to bool value NO.
Below are the callbacks the app would receive on receiving the push notifications. In case you have disabled swizzling, include calls to Growlytics SDK methods on receiving notification callbacks as shown below:
import UIKit
import Growlytics
import UserNotifications

@QUIApplicationMain
class AppDelegate: UIResponder, UIApplicationDelegate, UNUserNotificationCenterDelegate {

     //
     // ....OTHER FUNCTIONS......
     //

    // MARK:- UserNotifications Framework callback method
    @available(iOS 10.0, *)
    func userNotificationCenter(_ center: UNUserNotificationCenter, didReceive response: UNNotificationResponse, withCompletionHandler completionHandler: @escaping () -> Void) {

        //Call only if GROWLYTICS_SWIZZLING is NO
        GrowlyticsMessagingService.shared.didReceiveNotificationResponse(center, didReceive: response)

        //Custom Handling of notification if Any
        let pushDictionary = response.notification.request.content.userInfo print(pushDictionary)
        print(pushDictionary)

        completionHandler()
    }

    @available(iOS 10.0, *)
    func userNotificationCenter(_ center: UNUserNotificationCenter, willPresent notification: UNNotification, withCompletionHandler completionHandler: @escaping (UNNotificationPresentationOptions) -> Void) {
        //This is to only to display Alert and enable notification sound completionHandler([.sound,.alert])
    }

}
## Step 4: Report Push Token to Growlytics
When you ask for push permission and push permission is approved, an push token is generated and returned by iOS. This push token will be used by Growlytics to send notifications from Growlytics dashboard. To report generated push notification to Growlytics, you can use `setPushToken` method of `GrowlyticsMessagingService` class as shown in code snippet below.
```swift
import UIKit
import Growlytics
import UserNotifications
@QUIApplicationMain
class AppDelegate: UIResponder, UIApplicationDelegate, UNUserNotificationCenterDelegate, NotificatioDataSendingDelegateProtocol {
//
// ....OTHER FUNCTIONS......
//
// THIS FUNCTION WILL BE CALLED WHEN PUSH PERMISSION IS GRANTED.
func application(_ application: UIApplication,
didRegisterForRemoteNotificationsWithDeviceToken deviceToken: Data) {
GrowlyticsMessagingService.shared.setPushToken(token)
GrowlyticsMessagingService.shared.delegate = self
}
// THIS FUNCTION WILL BE CALLED WHEN PUSH PERMISSION IS DENIED.
func application(_ application: UIApplication, didFailToRegisterForRemoteNotificationsWithError error: Error) {
GrowlyticsMessagingService.shared.didFailToRegisterForPush()
}
// THIS FUNCTION WILL BE CALLED BY GROWLYTICS SDK WHEN
// USER CLICKS ON PUSH NOTIFICATION SENT WITH GROWLYTICS TO PROVIDE PUSH CONTEXT DATA LIKE KEY VALUE PAIRS AND SCREEN NAME.
func sendNotificationDataToAppDelegate(kvPair: [[String : Any]],
screenName: String, action: String) {
}
}
```
## Step 5: Configure Notification Service Extension
Notifications have got a complete revamp after the release of iOS10 with the introduction of new UserNotifications and UserNotificationsUI framework. And with this we got Notification Service App Extensions, which can be used for following:
1. **Add media support in Notifications:** Post iOS10 Apple has given us the ability to add image files to the notifications and this can be done using the Notification Service Extension.
2. **For Tracking Notification Impression:** We can track if a Notification is received by the device using the Notification Service Extension.
Follow the below steps to set up Notification Service Extension:
1. Create a Notification Service Extension Target:
Craete Notification Service Extension
2. Set the name of the extension target and the programing language which you want to use:
3. After the target is created, **Activate the scheme** for Extension when prompted for the same. After this, your extension will be added to the project you will see a class with the extension name provided by you while creating and .plist file associated with it.
4. Then make sure that the Push Notifications Capability is enabled for the Notification Service Extension created:
Enable Push Notification For Notifaction Service
5. Next, you will need to add "UserNotifications.framework" to the extention target that we created. Add UserNotifications framework to Linked Frameworks and Libraries of notification service extension target as shown below:
In the new class created by notification service extension, do the following changes
```swift
import UserNotifications
import Growlytics
class NotificationService: UNNotificationServiceExtension {
var contentHandler: ((UNNotificationContent) -> Void)?
var bestAttemptContent: UNMutableNotificationContent?
override func didReceive(_ request: UNNotificationRequest, withContentHandler contentHandler: @escaping (UNNotificationContent) -> Void) {
self.contentHandler = contentHandler
bestAttemptContent = (request.content.mutableCopy() as? UNMutableNotificationContent)
GrwNotificationServiceExtension.didReceive(request, withContentHandler: contentHandler)
}
override func serviceExtensionTimeWillExpire() {
// Called just before the extension will be terminated by the system.
// Use this as an opportunity to deliver your "best attempt" at modified
// content, otherwise the original push payload will be used.
}
}
```
# Handling Push Click
While configuring push campaign in growlytics dashboard, you can specify any of following 3 click actions:
1. Open Web URL
2. Open Deep Link
3. Open App
4. Open Screen
you can pass custom key value meta information with push notification. This will help you build contextful notification click actions.
This method calls when user clicks on push notification and developer can perform an action on the basis of notification type:
```swift
import UIKit
import Growlytics
import UserNotifications
@QUIApplicationMain
class AppDelegate: UIResponder, UIApplicationDelegate, UNUserNotificationCenterDelegate {
var window: UIWindow?
//
// ....OTHER FUNCTIONS......
//
// THIS FUNCTION WILL BE CALLED BY GROWLYTICS SDK WHEN
// USER CLICKS ON PUSH NOTIFICATION SENT WITH GROWLYTICS.
func sendNotificationDataToAppDelegate(kvPair: [[String : Any]],
screenName: String, action: String) {
}
}
```
# Other
# Upload Customers using CSV
You can upload CSV files to create or update user information as well as to pass their attributes. To use this feature, go to Customers page and click on "Upload CSV" button.
{% hint style="warning" %}
File upload restrictions
* Maximum 25 columns allowed.
* If any of the row value does not match with its data type, upload will fail.
* Maximum 10,000 rows allowed in a single upload.
{% endhint %}
# Email
In order to send emails to your customers, you are required to use your own email provider. This way, sender reputation will be in your control and it will help keeping better delivery retes.
Growlytics integrates with following email service providers:
* Amazon Simple Email Service
* Mandrill
* SendGrid
* Custom SMTP
You can reach-out to us at in case you are using any other email provider.
# Amazon SES
Follow the steps mentioned in the page to send emails from Growlytics using Amazon Simple Email Service.
## Step1: Add and verify an email address on Amazon SES
1. Go to SES Home → Email Addresses. Click on **Verify a New Email Address** button.

2\. A popup will appear when you click on **Verify a New Email Address** button. Enter the email you want to use for sending emails from Growlytics and click on **Verify This Email Address** button.
3\. On email address you entered, you will receive a email from amazon which will contain a verification link. Click on that link to complete email verification.
4\. After verification is done, you will see the email in the Email Addresses section of SES with status verified in green(as shown in the screenshot above).
{% hint style="warning" %}
Make sure you are not in *Sandbox* mode of your account. If so, the recipient address is also required to be verified.
{% endhint %}
## Step2: Request AWS to increase allowed emails per day
By default, only 1 email per second and 200 emails per 24 hours. To increase that limit and use send bulk mails, you will need to submit a request to AWS. With the following steps, you can submit this request to AWS. You can also follow [AWS Guidelines](https://docs.aws.amazon.com/ses/latest/DeveloperGuide/manage-sending-quotas-request-increase-procedure.html) for the same.
In AWS console, click on **Support > Support Center** menu.

* On the **My support cases** tab, choose **Create case**.
* Under **Create case**, choose **Service limit increase**.
* Under **Case classification**, complete the following sections:
* For **Limit type**, choose **SES Service Limits**.
* For **Mail Type**, choose the type of email that you plan to send. If more than one value applies, choose the option that applies to the majority of the email that you plan to send.
* For **Website URL**, enter the URL of your website. Providing this information helps us better understand the type of content that you plan to send.
* For **My email sending complies with the AWS Service Terms and AUP**, choose the option that applies to your use case.
* For **I only send to recipients who have specifically requested my mail**, choose the option that applies to your use case.
* For **I have a process to handle bounces and complaints**, choose the option that applies to your use case.

## Step3: Configure Email Provider in Growlytics Dashboard
1. Login to Growlytics Dashboard.
2. Go to Integrations page.
3. Click on Emails Tab.
4. Click on "Add Provider" Button.
5. Click on "Amazon".
6. Enter configuration name for your reference purpose.
7. Enter server name and port values grabbed from Amazon SES → Dashboard → SMTP Settings.
8. Enter Username and Password values should your SMTP credentials from Amazon SES. These are not your AWS account credentials.
9. Enter From Address – It should be one of your emails from Amazon SES → Home → Verified Senders → Email addresses list. Most customers don't not open an email unless they recognize the sender.
10. Save your settings, send a test email to make sure integration is complete. You must receive a test email from configured SES account email id.
## Step4: Setup Delivery Reporting with Amazon SES
In order to view delivery reports on Growlytics dashboard, you will need to create an SNS topic, and subscribe to sns topic with Growlytics's webhook url and map it to SES email or domain.
Exact steps to setup SNS are mentioned below:
1. Login to your aws account and from services, select SNS(Simple Notification Service).
2. Click on "Create Topic" button on top right corner.
3. Fill out the details required to create a topic.
1. Topic Type: Standard
2. Name: Growlytics Delivery Notifier
3. Rest keep as it is.
4. Click on create topic button.
5. Once the topic is created, click on the "Create Subscription" button.
6. Fill out the details required to create a subscription.
1. Protocol: HTTPS
2. EndPoint: Use Growlytics webhook url, provided in growlytics dashboard while you are adding the provider.
7. Click on create subscription button.
8. Once subscription is created, you might see the subscribtion with status confirmed as shown in image below.
In case if you are facing any issue with integration, you can reach-out to us at
# SendGrid
Follow the steps mentioned in the page to send emails from Growlytics using SendGrid.
## Step 1: Configure Email Provider in Growlytics Dashboard
1. Login to Growlytics Dashboard.
2. Go to Integrations page.
3. Click on Emails Tab.
4. Click on "Add Provider" Button.
5. Click on "SendGrid".
6. Enter configuration name for your reference purpose.
7. In the host box, enter host value `smtp.sendgrid.net`
8. In the port input box, enter port value `587`
9. Enter Username and Password values same as your SendGrid account login `username` and `password` .
10. Enter From Address – It should be one of your emails from Amazon SES → Home → Verified Senders → Email addresses list. Most customers don't not open an email unless they recognize the sender.
11. Save your settings, send a test email to make sure integration is complete. You must receive a test email from configured SendGrid account.
In case if you are facing any issue with integration, you can reach-out to us at
## Step 2: Handling Bounces and Rejections
When an email is classified as bounced, rejected or unsubscribed by SendGrid, Growlytics also needs to be notified so that no further deliveries to that mailbox are attempted by Growlytics.
To enable support for **bounce** and **dropped** processing, follow the steps below:
1. Login to your SendGrid account.
2. Go to **Mail Settings > Event Notification**. Enable the Event Notification like mentioned in image below. Also make sure you have selected `Dropped`, `Bounced` from options.

3\. In http post url, mention Growlytics callback URL mentioned in SendGrid provider configuration (Integration > Email > Sendgrid).
{% hint style="info" %}
The count of email bounces is shown on the campaign report screen.
{% endhint %}
## Step 3: Handling Unsubscribes
Click [here ](https://docs.growlytics.in/channels/email/handling-unsubscribes)to view detailed guidelines to handle subscriptions.
# Custom SMTP
Follow the steps mentioned in the page to send emails from Growlytics using your own SMTP server.
Its not recommended to use your own SMTP server due to many resons like keeping sender reputation. Instead, you can use Amazon SES, Postmark, or SendGrid, you can also integrate your own SMTP gateway to send emails.
## Step1: Configure SMTP details in Growlytics Dashboard
1. Login to Growlytics Dashboard.
2. Go to Integrations page.
3. Click on Emails Tab.
4. Click on "Add Provider" Button.
5. Click on "Custom SMTP".
6. Enter configuration name for your reference purpose.
7. In the host box, enter your publicly accessible ip address or host name of your SMTP server.
8. In the port input box, enter your SMTP port.
9. Enter Username and Password values from your SMTP credentials, required to authenticate on SMTP server.
10. Enter From Address - this value will be used as sender email address. Most customers don't not open an email unless they recognize the sender.
11. Save your settings, send a test email to make sure integration is complete. You must receive a test email from configured SMTP server.
In case if you are facing any issue with integration, you can reach-out to us at
# Mobile Push Notifications
This guide will help you through the process of setting up your app so that Growlytics can dispatch push notifications to your app.
Here are the articles in this section:
{% content-ref url="/pages/u8hYCQ56jGeKVKIwN0BV" %}
[Configure FCM Channel](/channels/mobile-push-notifications/configure-fcm-channel)
{% endcontent-ref %}
# Configure FCM Channel
Sending push notifications to Android devices is done via [Firebase Cloud Messaging](https://firebase.google.com/docs/cloud-messaging/). Detailed configuration steps to setup firebase cloud messaging are given below.
## Step1: Generate FCM Credentials
In order to use Firebase messaging, you'll need to generate a .JSON server key, which you enter in the push notification settings. Steps are given below.
* Make sure that the Firebase Cloud Messaging API is enabled for your project. You can [check that here](https://console.developers.google.com/apis/api/fcm.googleapis.com/overview).
* Log into the Firebase Console for your project.
* Head into your Project settings by clicking on the gear icon in the sidebar:

* Select the **Service Accounts** tab and click on the **Generate New Private Key** button. You will see a confirmation dialog after which the prompt to download the credential file should appear

## Step 2: Configure FCM credentials on Growlytics Dashboard
* Login to Growlytics Dashboard.
* Go to Integrations => Mobile Push Notifications.
* Click on "Android FCM" tab.
* Next, click on "Configure FCM Push" button. You will see a popup to provide private key file generated from firebase admin dashboard. Upload the file and click on save changes button.
## Step 3: Enable FCM Capablity in GCP Console
Once the JSON is configured, FCM should be enabled in the [cloud console](https://console.cloud.google.com/apis/library/fcm.googleapis.com)
# Web Push Notifications
This guide will help you through the process of setting up your website so that Growlytics can send web push notifications to your website users.
This section will cover how you can setup Web Push as a channel on Growlytics. Before you start, make sure you've integrated the [Browser SDK](https://docs.growlytics.in/integration/browser/installation), setup will not work otherwise.
{% hint style="info" %}
Supported browsers are: Chrome, Firefox, Microsoft Edge, and Opera
{% endhint %}
## Step 1: Generate WebPush Credentials
To send web push notifications, VAPID credentials are required according to [specification](https://tools.ietf.org/html/draft-thomson-webpush-vapid-02)s. Growlytics takes care of generating credentials for you. But if you already have used credentials elsewhere, you can configure the same credentials.
* Login to Growlytics dashboard.
* At the top right corner, click on *Integrations* > *Web Push Notification*
* Click on Generate VAPID keys if you don't already have the keys else you can provide the VAPID public and private keys in input box.
* Click on save changes.
## Step 2: Configure Browser Sdk
Web Push requires service worker to be registered.
Add service worker script in your project. You can use Growlytics provided service worker template or if you already have service worker implemented in your project you can add Growlytics's service worker script.
* Download service worker file from [here](https://static.growlytics.in/web_push/growlytics_sw_template.js). Add this service worker file at root of your project with any name like `growlytics-sw.js`.
* Once, you have added service worker file in your project, inform Growlytics to use that service worker file by providing URL of that file against `serviceWorkerFile`attribute at g`rowlyticsSettings` variable which is being used in the Growlytics script. An example is given below.
```javascript
// Initialize Growlytics
let growlyticsSettings = {
//.... Other Growlytics Settings
// Configure push notifications, For more details, visit https://docs.growlytics.in/channels/web-push-notifications
webPushEnabled: true, // Enable/disable web push module, disabled if not provided
// Fully qualified URL of service worker file
serviceWorkerFile: 'service worker file location'
};
```
{% hint style="info" %}
Also make sure `webPushEnabled` flag is set to true in `growlyticsSettings`variable being passed to Growlytics script.
{% endhint %}
## **Step 3: Requesting User Permissions**
If you have disabled auto-request permission at page load from dashboard, you can also use `requestNotificationPermission()`method anytime to ask for notification permission. An example is given below.
```javascript
Growlytics.requestNotificationPermission();
```
With the above integration steps, you should be able to send push notifications to users using Growlytics campaigns.
## Additional Notes
Payload structure of web push notification sent from Growlytics will have following structure.
| Key | Data Type | Description |
| ----------- | --------- | ------------------------------------------------------------------------------------------------------- |
| glytcs\_pnf | boolean | If this field is present, means notification is received from Growlytics. |
| glytcs\_id | string | Notification tracking id used by Growlytics. |
| glytcs\_icn | string | Url of an notification icon. If given, this URL will be used to show small application in notification. |
| glytcs\_img | string | Url of an notification Image. If given, this URL will be used to show large image in notification. |
| glytcs\_tl | string | Notification title, must be present or app name will be used as title. |
| glytcs\_msg | string | Notification body, must be present, if not provided, notification will not be shown. |
| glytcs\_dl | string | If present, this is a deep link that must be followed at the time of notification open. |
# Ad Networks
Growlytics allows you to sync your segments with Ad Networks to create highly targeted ads at minimum cost. Using Growlytics segments, you can keep dynamic list of audiences for Google and Facebook Ads.
Using customer's existing information like email id or other personally identifiable attributes, you can programmatically sync your Growlytics segments with Ad Networks as audiences. This eliminates the manual process of uploading customer lists and it also ensure parity in the people you reach in Customer.io and your Ad Network.
To know more about ad audiences, you can study platform’s specific documentation: [Facebook Ads](https://www.facebook.com/business/help/381385302004628), [Google Ads](https://support.google.com/google-ads/answer/6379332)
# Facebook Audiences
Integrate your facebook account and Sync Growlytics segments with facebook audience for highly targeted ads.
To sync audience or users to Facebook, you will access to facebook's Marketing API. This can be acheived by creating an app on facebook developer console and giving that app permissions to snyc custom audience with Facebook.
Follow below steps to setup facebook app:
1. Go to [FB business settings page](https://business.facebook.com/settings). Scroll to Apps and click on **Add > Create a new app ID** option under Apps menu.
2. Select "Manage Business INtegrations" in the purpose of creating this new app and click Continue.
3. Once the app gets created, App dashboard will open and you will see option to add Products.
4. Search for Marketing API and click Set Up. Your app will be created in dev mode and is ready for testing.
## Step2: Connect Facebook Account With Growlyitcs
1. Login to Growlytics Dashboard. Go to Settings> Social Media.
2. Click on Add / Edit Provider.
3. In Social Media, select "Facebook"
4. Enter Add Account ID and App Access Token That you have created in earlier step.
5. Click on Save Changes.
# Google Ad Audiences
Integrate your google ads account and Sync Growlytics segments with google ads audience for highly targeted ads.
### Step1: Connect your google ads account
1. Go to Integrations > Google Ads.
2. Click on 'Connect Google Account' button.
1. Next, you’ll be asked to grant Growlytics Audience Sync access to Manage your Adwords Campaigns. This access will allow the sync to occur.
2. Once you’ve allowed access, you’re done!
### Step 2: Create Google Ads Audience Synced with Growlytics
1. Once Google Ads account connected, Select the Ad account, click on next button.
2. Click on "Create Audience" button.
3. Specify name of the audience, we suggest adding " - Growlytics Synced" at the end of audience name to keep audiences organized in the Google Ad Network.
4. Add description for the audience and click on create audience.
5. You're done! You've successfully created a Google Ads audience which is hourly synced with Growlytics.
### Step 3: Syncing segment with audience
1. Go to segment list page, select a segment to open segment detail page.
2. On segment detail page, click on "Ad Audiences" tab.
3. Select the channel you want to sync.
# Overview
With REST APIs, you have programmatic access to all of Growlytics Data. To make the APIs simple to understand, we have listed all the scenarios for which you may want to have API access.
{% hint style="warning" %}
If you are looking for additional APIs apart from the scenarios mentioned below, you can write to us at
{% endhint %}
## API Authentication
For each Growlytics API call, you must include a header `x-growlytics-key`. To access your api-key you can follow the steps given below.
1. Login to Growlytics Dashboard.
2. Go to the settings page.
3. Go to "Platform Integration" Section, you will see API key for your account there.
## APIs for different use cases
{% content-ref url="/pages/-MWyD1wqG6rRkG4lHYLY" %}
[Tracking Users (Shopify Only)](/rest-apis/tracking-users)
{% endcontent-ref %}
{% content-ref url="/pages/-MWyD4B7jJwxyNbydIsO" %}
[Tracking Events (Shopify Only)](/rest-apis/tracking-events)
{% endcontent-ref %}
# Tracking Users (Shopify Only)
{% hint style="warning" %}
Use this apis if you are using shopify.
{% endhint %}
With user tracking APIs, you can create a new user or update existing users. For each customer being created/updated you will need to provide a unique identifier of this customer. The identifier can be a customer's email id or mobile number or Shopify customer id if you have one.
## /track/user
`POST` `https://dc.growlytics.in/track/user`
Using `/track/user` API, you can create or update the customer. If the customer already exists with a given unique id, the customer will be updated, otherwise, a new customer will be created.
#### Headers
| Name | Type | Description |
| ---------------- | ------ | ------------------ |
| x-growlytics-key | string | Growlytics API Key |
#### Request Body
| Name | Type | Description |
| ---------- | ------ | ----------------------------------------------------------------------------------------------------------------------------------------------------------------------------------------------------------- |
| attributes | object | Key-value pairs. Customer's dynamic attributes. `name`, `email` and `mobile`C are reserved attributes. If you are mentioning the user's email or mobile or full name, please use these reserved attributes. |
| id | string | Customer's unique id. If the customer already exists with a given unique id, the customer will be updated. Otherwise, a new customer will be created. |
{% tabs %}
{% tab title="200 When customer is successfully created or updated." %}
```
{
success: true
}
```
{% endtab %}
{% tab title="422 When invalid input is provided. You will get reponse with details of what exactly is wrong. " %}
```
```
{% endtab %}
{% endtabs %}
## API Example
{% tabs %}
{% tab title="Node JS" %}
```javascript
// Prepare Request input data
const requestBody = {
id: 'lksjfiwowior', // Customer's unique identifier.
attributes:{
// Reserved attributes, used for campaigns.
name: 'John Wick',
email: 'john@gmail.com',
mobile: '9876543210',
// Add your own custom customer variables here, ie:
subscriptionType: 'pro',
region: 'Mumbai',
totalPurchaseTillNow: 30000
}
};
// Call API
const request = require('request-promise');
request({
method: 'POST',
uri: 'https://dc.growlytics.in/track/user',
headers: {
Accept: 'application/json',
'x-growlytics-key': ''
},
body: requestBody
});
```
{% endtab %}
{% endtabs %}
## Terms & Considerations
1. *Custom Attribute* names must be less than 50 characters.
2. *Custom Attribute* names are case-sensitive.
3. Allowed data types for event attributes:`String`, `Number`, `Boolean`, `Date`
4. A maximum of 50 *Event Attributes* allowed per custom event*.*
5. In a Customer Profile, you can set a maximum number of 50 custom attributes.
6. Data types of each attributes are defined when they are tracked for the first time. For the second time, if the data type is not matching with the original data type, attributes will be ignored.
# Tracking Users (Non-shopify)
Use this apis if you are not using shopify.
With user tracking APIs, you can create a new user or update existing users. For each customer being created/updated you will need to provide a unique identifier of this customer. The identifier can be a customer's email id or mobile number.
## /rest-api/customer
`POST` `https://dcqs-india.growlytics.in/rest-api/customer`
Using /rest-api/customer API, you can create or update the customer. If the customer already exists with a given unique id, the customer will be updated, otherwise, a new customer will be created.
#### Headers
| Name | Type | Description |
| -------------------------------------------------- | ------ | ------------------ |
| x-growlytics-key\* | string | Growlytics API Key |
#### Request Body
| Name | Type | Description |
| -------------------------------------------- | -------------------------- | ----------------------------------------------------------------------------------------------------------------------------------------------------- |
| attributes\* | object {name, type, value} | Array Of attributes. Each array item will be an object. having: name, type, value. |
| id\* | string | Customer's unique id. If the customer already exists with a given unique id, the customer will be updated. Otherwise, a new customer will be created. |
| | | |
{% tabs %}
{% tab title="200 When customer is successfully created or updated." %}
```
{
success: true
}
```
{% endtab %}
{% tab title="422 When invalid input is provided. You will get reponse with details of what exactly is wrong. " %}
```
```
{% endtab %}
{% endtabs %}
## API Example
{% tabs %}
{% tab title="Node JS" %}
```javascript
// Prepare Request input data
const requestBody = {
"id":"your-system-uniqe-id",
"attributes": [
{ name: 'name', type: 'string', value: `Customer Name` },
{ name: 'email', type: 'string', value: `customer_email@gmail.com` },
{ name: 'mobile', type: 'string', value: '9919211112' }
// Custom Attributes (Allowed Types: number, date, boolean, string)
{ name: 'City', type: 'string', value: 'Mumbai' },
{ name: 'Total Orders', type: 'number', value: 1 },
{ name: 'Is First Time Purchaser', type: 'boolean', value: true },
{ name: 'Last Order Date', type: 'date', value: 'YYYY-MM-DD HH:MM:SS' },
]
};
// Call API
const request = require('request-promise');
request({
method: 'POST',
uri: 'https://dcqs-india.growlytics.in/rest-api/customer',
headers: {
Accept: 'application/json',
'x-growlytics-key': ''
},
body: requestBody
});
```
{% endtab %}
{% endtabs %}
## Terms & Considerations
1. *Custom Attribute* names must be less than 50 characters.
2. *Custom Attribute* names are case-sensitive.
3. Allowed data types for event attributes:`string`, `number`, `boolean`, `date`
4. In a Customer Profile, you can set a maximum number of 100 custom attributes.
5. Data types of each attributes are defined when they are tracked for the first time. For the second time, if the data type is not matching with the original data type, attributes will be ignored.
# Tracking Events (Shopify Only)
Use this api document only if you have integrated Growlytics Connector app from shopify app store.
Track an event by providing an event name, customer id, and event properties. Sending events to Growlytics requires a POST request with a JSON payload specifying the event information.
## Track Event API
`POST` `https://dc.growlytics.in/track/event/v2`
Using `/track/event/v2` API, you can add create events to Growlytics.
#### Headers
| Name | Type | Description |
| -------------------------------------------------- | ------ | ------------------ |
| x-growlytics-key\* | String | Growlytics API Key |
#### Request Body
| Name | Type | Description |
| -------------------------------------------- | ------ | --------------------------------------------------------------------- |
| customerId\* | string | Customer id. Customer's unique identifier. Your system's customer id. |
| name\* | string | Event Name |
| time\* | number | Event time. Unix EPOCH time in Milliseconds. |
| attributes\* | object | List of Attributes of Event |
{% tabs %}
{% tab title="200 " %}
```
```
{% endtab %}
{% endtabs %}
{% hint style="warning" %}
Growlytics supports `Number, BigInt, String, Boolean` and `Date` data types for event property values. For further details refer to [event tracking considerations.](https://docs.growlytics.in/core-concepts-1/events#default-metadata-recorded-automatically)
{% endhint %}
## API Example
{% tabs %}
{% tab title="Node JS" %}
```javascript
const moment = require('moment');
const requestBody = {
name: 'Add To Cart',
customerId: 'YOUR_APP_CUSTOMER_ID', // YOUR APP'S CUSTOMER ID
time: moment().valueOf(), // Unix EPOCH time in Milliseconds
attributes: [
{ name: 'Order ID', value: 'SDFICSRDCVSSDSDG', type: 'string' },
{ name: 'Amount', value: 732.23, type: 'number' },
{ name: 'Order Time', value: '2020-01-20 19:14:15', type: 'date' }, // Date in YYYY-MM-DD HH:mm:ss format
{ name: 'Is Prepaid Order', value: true, type: 'boolean' },
// Array Types
{ name: 'Product IDs', value: ['pid1', 'pid2', 'pid3'], type: 'string array' },
{ name: 'Sku Purchased', value: ['sku1', 'sku4', 'sk2'], type: 'string array' },
// Key Value Attributes
{ name: 'Payment Details', value: { payment_mode: 'cod', transaction_id: '8276473782342' }, type: 'string map' },
{ name: 'Product Wise Discount Amount', value: { pid1: 12.7, p2: 11.5 }, type: 'number map' },
{ name: 'Product Wise Discount Used', value: { pid1: true, p2: true, pid3: false }, type: 'boolean map' },
{ name: 'Product Wise Delivery Dates', value: { p1: '2020-01-21 19:14:15', p2: '2020-01-20 15:14:15' }, type: 'date map' },
// Custom Type
{
name: 'Full Order Details',
type: 'custom',
value: {
'Order ID': 'SDFICSRDCVSSDSDG',
Amount: 732.23,
'Order Time': '2020-01-20 19:14:15',
Products: [
{ id: 'pi1', name: 'Mixer', price: 100, quantity: 2 },
{ id: 'pi2', name: 'Juicer', price: 100, quantity: 5 }
]
}
}
]
};
// Call API
const request = require('request-promise');
request({
method: 'POST',
uri: 'https://dc.growlytics.in/track/event',
headers: {
Accept: 'application/json',
'x-growlytics-key': ''
},
body: requestBody
});
```
{% endtab %}
{% endtabs %}
## Terms & Considerations
1. *Custom Event* names must be less than 50 characters.
2. *Custom Event Attribute* names are case-sensitive.
3. Allowed data types for event attributes:`String`, `Number`, `Boolean`, `Date,` `Map` and `Custom`. For further details refer to [event tracking considerations.](https://docs.growlytics.in/core-concepts-1/events#default-metadata-recorded-automatically)
4. A maximum of 50 *Event Attributes* allowed per custom event*.*
5. Data types of each event attributes are defined when they are tracked for the first time. For the second time, if the data type is not matching with the original data type, attribute values will be ignored.
# Tracking Events (Non-shopify)
Use this apis if you are not using shopify.
Track an event by providing an event name, customer id, and event properties. Sending events to Growlytics requires a POST request with a JSON payload specifying the event information.
## Track Event API
`POST` `https://dcqs-india.growlytics.in/rest-api/event`
Using `/rest-api/event` API, you can add events to Growlytics.
#### Headers
| Name | Type | Description |
| -------------------------------------------------- | ------ | ------------------ |
| x-growlytics-key\* | String | Growlytics API Key |
#### Request Body
| Name | Type | Description |
| -------------------------------------------- | ------ | --------------------------------------------------------------------- |
| customerId\* | string | Customer id. Customer's unique identifier. Your system's customer id. |
| name\* | string | Event Name |
| attributes\* | object | List of Attributes of Event |
{% tabs %}
{% tab title="200 " %}
```
```
{% endtab %}
{% endtabs %}
{% hint style="warning" %}
Growlytics supports `number, string, boolean and date` data types for event property values. For further details refer to [event tracking considerations.](https://docs.growlytics.in/core-concepts-1/events#default-metadata-recorded-automatically)
{% endhint %}
## API Example
{% tabs %}
{% tab title="Node JS" %}
```javascript
const moment = require('moment');
const requestBody = {
name: 'Add To Cart',
customerId: 'YOUR_APP_CUSTOMER_ID', // YOUR APP'S CUSTOMER ID
attributes: [
{ name: 'Order ID', value: 'SDFICSRDCVSSDSDG', type: 'string' },
{ name: 'Amount', value: 732.23, type: 'number' },
{ name: 'Order Time', value: '2020-01-20 19:14:15', type: 'date' }, // Date in YYYY-MM-DD HH:mm:ss format
{ name: 'Is Prepaid Order', value: true, type: 'boolean' }
]
};
// Call API
const request = require('request-promise');
request({
method: 'POST',
uri: 'https://dcqs-india.growlytics.in/rest-api/event',
headers: {
Accept: 'application/json',
'x-growlytics-key': ''
},
body: requestBody
});
```
{% endtab %}
{% endtabs %}
## Terms & Considerations
1. *Custom Event* names must be less than 50 characters.
2. *Custom Event Attribute* names are case-sensitive.
3. Allowed data types for event attributes:`string`, `number`, `boolean`, `date`
4. A maximum of 50 *Event Attributes* allowed per custom event*.*
5. Data types of each event attributes are defined when they are tracked for the first time. For the second time, if the data type is not matching with the original data type, attribute values will be ignored.
# Syncing Products
Use product sync APIs to sync the product and inventory of your store with Growlytics. This article will give you all the details you need to create products, collections and map products to collections.
## Data Structure Of Product And Collections
The data structure of products and collections is many to many kinds of relationships. One collection can have multiple products and one product can be in multiple collections.

## Add/Update Products
`POST` `https://dc.growlytics.in /product`
Using `/product` API, you can add products to Growlytics. If a product not found with the given id, it will be created, else it will be updated.
#### Headers
| Name | Type | Description |
| ---------------- | ------ | ------------------ |
| x-growlytics-key | String | Growlytics API Key |
#### Request Body
| Name | Type | Description |
| ------------------- | ------ | ------------------------------------------------------------------------------------------------------------------------- |
| id | string | Product id. Your system's unique product id. Max 50 chars allowed. |
| name | string | Product name. Max 2000 chars allowed. |
| image | string | Product Image url. Max 1000 characters allowed. |
| description | string | Product description. Max 2000 characters allowed. Null and empty values are alo allowed. |
| url | string | Url of the product. Max 1000 characters allowed. |
| price | number | Price of the product. Decimals are also allowed. Example: 12.20, 1321, 15.5 |
| originalHigherPrice | number | Product price without discount. Decimals are also allowed. Provide this field to show discounts in the campaign messages. |
| vendor | string | Vendor of the product. Max 1000 characters allowed. |
| status | string | Inventory status of the product. Allowed values are `inStock` and `outOfStock` |
{% tabs %}
{% tab title="200 Product synced successfully." %}
```
{ success: true }
```
{% endtab %}
{% tab title="422 Invalid input. " %}
```
{
"type": "ValidationError",
"details": [
{
"message": "status must be one of [inStock, outOfStock]",
"path": [
"status"
],
"type": "any.allowOnly",
"context": {
"value": "1outOfStock",
"valids": [
"inStock",
"outOfStock"
],
"key": "status",
"label": "status"
}
}
]
}
```
{% endtab %}
{% endtabs %}
## Remove Product
`DELETE` `https://dc.growlytics.in/product/:id`
Use this API to delete products from Growlytics's product dataset.
#### Path Parameters
| Name | Type | Description |
| ---- | ------ | ---------------------------------------------------------------- |
| id | string | Product Id. Your system's product Id. Max 50 characters allowed. |
#### Headers
| Name | Type | Description |
| ---------------- | ------ | ------------------ |
| x-growlytics-key | string | Growlytics API Key |
{% tabs %}
{% tab title="200 Product deleted successfully." %}
```
{ success: true }
```
{% endtab %}
{% endtabs %}
## Add/Update Collection
`POST` `https://dc.growlytics.in/collection`
Using `/collection` API, you can add or update collection in the Growlytics collection dataset. If a collection does not exist for given id, it will be created, else it will be updated.
#### Headers
| Name | Type | Description |
| ---------------- | ------ | ------------------ |
| x-growlytics-key | string | Growlytics API Key |
#### Request Body
| Name | Type | Description |
| ----- | ------ | ------------------------------------------------------------------------- |
| id | string | Collection Id. Your system's unique collection id. Max 50 chars allowed. |
| name | string | Collection name. Max 2000 characters allowed. |
| image | string | |
| url | string | |
{% tabs %}
{% tab title="200 " %}
```
{ success: true }
```
{% endtab %}
{% tab title="422 " %}
```
{
"type": "ValidationError",
"details": [
{
"message": "status must be one of [inStock, outOfStock]",
"path": [
"status"
],
"type": "any.allowOnly",
"context": {
"value": "1outOfStock",
"valids": [
"inStock",
"outOfStock"
],
"key": "status",
"label": "status"
}
}
]
}
```
{% endtab %}
{% endtabs %}
## Delete Collection
`DELETE` `https://dc.growlytics.in/collection/:id`
Use this api to delete collection from Growlytics collection dataset. You will need to pass the id of the collection in url.
#### Path Parameters
| Name | Type | Description |
| ---- | ------ | ---------------------------------------------------------------- |
| id | string | Id of the collection to be removed. Your system's collection id. |
#### Headers
| Name | Type | Description |
| ---------------- | ------ | ------------------- |
| x-growlytics-key | string | Growlytics API Key. |
{% tabs %}
{% tab title="200 " %}
```
{ success: true }
```
{% endtab %}
{% endtabs %}
## Mapping Products & Collections
Products and Collections have many to many relationships. You can use APIs to add or remove multiple products from a particular collection.
## Add products to the collection
`POST` `https://dc.growlytics.in/collection/:id/products/add`
Use this API to add multiple products to the collection. You will need to pass the collection id in the URL.
#### Path Parameters
| Name | Type | Description |
| ---- | ------ | ------------------------------------------- |
| id | string | Collection id. Your system's collection id. |
#### Request Body
| Name | Type | Description |
| -------- | ----- | ------------------------------------------------------------------------------------------- |
| products | array |
Array of string. List of product ids. Example: \['produc id 1', 'product id 2']
|
{% tabs %}
{% tab title="200 " %}
```
{ success: true }
```
{% endtab %}
{% tab title="422 " %}
```
{
"type": "ValidationError",
"details": [
{
"message": "status must be one of [inStock, outOfStock]",
"path": [
"status"
],
"type": "any.allowOnly",
"context": {
"value": "1outOfStock",
"valids": [
"inStock",
"outOfStock"
],
"key": "status",
"label": "status"
}
}
]
}
```
{% endtab %}
{% endtabs %}
{% hint style="warning" %}
Make sure you have added products and collections in Growlytics before adding them to any collection. In short, products and collections to be mapped must exist in Growlytics.
{% endhint %}
## Remove products from the collection
`POST` `https://dc.growlytics.in/collection/:id/products/remove`
Use this API to remove multiple products from a particular collection. You will need to pass the collection id in the URL.
#### Path Parameters
| Name | Type | Description |
| ---- | ------ | ------------------------------------------- |
| id | string | Collection id. Your system's collection id. |
#### Request Body
| Name | Type | Description |
| -------- | ----- | ---------------------------------------------------------------------------- |
| products | array |
Array of string. List of product ids. Example: \['pid 1', 'pid 2']
|
{% tabs %}
{% tab title="200 " %}
```
{ success: true }
```
{% endtab %}
{% tab title="422 " %}
```
{
"type": "ValidationError",
"details": [
{
"message": "status must be one of [inStock, outOfStock]",
"path": [
"status"
],
"type": "any.allowOnly",
"context": {
"value": "1outOfStock",
"valids": [
"inStock",
"outOfStock"
],
"key": "status",
"label": "status"
}
}
]
}
```
{% endtab %}
{% endtabs %}
# Mobile App Apis
Use mobile app apis to sync events and customer data with the Growlytics platform.
## App Launch API
Call this api everytime when app is launched. This API will require a device id. Pass null if you don't have the device id (case when the app launched for the first time). If you won't pass the device id, this API will return a newly generated device id in response. Store that device id locally for all subsequest requests.
## App Launch
`POST` `https://dc.growlytics.in/mcrs_appl_v1`
#### Headers
| Name | Type | Description |
| ---------------- | ------ | ------------------- |
| x-growlytics-key | string | Growlytics Api key. |
#### Request Body
| Name | Type | Description |
| --------- | ------ | ------------------------------------------------------------------------------------------------------------------------------------------------------------------------------------------------------------------------------------------------ |
| timestamp | number | Event time. Unix Timestamp in milli seconds. |
| info | object | A JSON with device details like device type, app version etc. Structure of the info is mentioned below. |
| did | string | Device id. If device id is specified, app launch event will be tracked against given device id. If device id not specified, a new device profile will be created and device profile id will be returned in response to use it for next requests. |
{% tabs %}
{% tab title="200 Success" %}
```javascript
{
"did": "--device-id--goes-here",
"sid": "--session id goes here"
}
```
{% endtab %}
{% tab title="422 Invalid input. Request payload is not in valid format." %}
```javascript
{
"type": "ValidationError",
"details": [
{
"message": "type is required",
"path": [
"type"
],
"type": "any.required",
"context": {
"key": "type",
"label": "type"
}
}
]
}
```
{% endtab %}
{% endtabs %}
The structure of the info object is mentioned below.
{% tabs %}
{% tab title="Structure of Info object in request body" %}
```javascript
{
appVersionCode: number, required
appVersionName: string, required
sdkVersion: number, required
// Is First Time
firstTime: boolean, required
deviceType: string, required
deviceManufacturer: string, required
deviceModel: string, required
deviceCarrier: string, required
osName: string, required
osVersion: string, required
platform: string, required, valid('ANDROID', 'IOS')
language: string, required
referrer: string, optional, // Traffic Source
utmInfo: {
us: string, required, optional, allow(null) // UTM source
um: string, required, optional, allow(null) // UTM medium
uc: .string, required, optional, allow(null) // UTM campaign
}
}
```
{% endtab %}
{% tab title="Example of info object" %}
```javascript
{
"appVersionCode": 16,
"appVersionName": "4.2.11",
"osName": "Android",
"osVersion": "Android 9",
"language": "en",
"platform": "ANDROID",
"deviceType": "MOBILE",
"deviceManufacturer": "OnePlus",
"deviceModel": "ONEPLUS A5000",
"deviceCarrier": "Vodafone IN",
"sdkVersion": 1,
"firstTime": false,
"referrer": "https://facebook.com",
"utmInfo": {
"us": "google",
"um": "email",
"uc": "Diwali Campaign"
}
}
```
{% endtab %}
{% endtabs %}
## Event Tracking API
Call this API when you want to track a particular event.
## Track Event API
`POST` `https://dc.growlytics.in/msv_cevt`
Use this API to track events from your mobile app.
#### Headers
| Name | Type | Description |
| ---------------- | ------ | ------------------- |
| x-growlytics-key | string | Growlytics API key. |
#### Request Body
| Name | Type | Description |
| --------- | ------ | ---------------------------------------------------------------------------------------- |
| did | string | Device id. Required. |
| name | string | Event Name. Required, Max 120 characters. |
| timestamp | number | Unix timestamp in milli-seconds. Required.. 13 digits. |
| info | array | List of event attributes. Detailed structure of the array is mentioned below seperetely. |
{% tabs %}
{% tab title="200 Success. Event Tracked Successfully." %}
```javascript
{ success: true }
```
{% endtab %}
{% tab title="422 Invalid Input. Request payload is not in valid format." %}
```javascript
{
"type": "ValidationError",
"details": [
{
"message": "type is required",
"path": [
"type"
],
"type": "any.required",
"context": {
"key": "type",
"label": "type"
}
}
]
}
```
{% endtab %}
{% endtabs %}
A sample structure of the info object for event tracking is mentioned below.
{% tabs %}
{% tab title="Structure of Info object in request body" %}
```javascript
info: [
{
"name": Required, Max 120 characters
"value": Required, null allowed, Max 100 characters
"type": Required, Allowed: 'integer', 'float', 'double', 'long', 'boolean', 'date', 'string'
}
]
```
{% endtab %}
{% tab title="Example of info object" %}
```javascript
info: [
{
"name": "Product Name",
"value": "Macbook Pro 2020",
"type": "string"
},
{
"name": "Category",
"value": "Electronics",
"type": "string"
},
{
"name": "SubCategory",
"value": "Laptops",
"type": "string"
},
{
"name": "Price",
"value": 139000,
"type": "integer"
},
{
"name": "Is Under Warranty",
"value": true,
"type": "boolean"
},
{
"name": "Product Expiry Date",
"value": "2020-01-20 19:14:15",
"type": "date"
}
]
```
{% endtab %}
{% endtabs %}
## Customer Login API
Call this API when a customer logs in to your mobile app.
## Identify Customer API
`POST` `https://dc.growlytics.in/msv_cs_id`
#### Headers
| Name | Type | Description |
| ---------------- | ------ | ------------------- |
| x-growlytics-key | string | Growlytics API Key. |
#### Request Body
| Name | Type | Description |
| ---------------- | ------ | --------------------------------------------------------------------------------------------------------------- |
| did | string | Device id. Required. |
| clientCustomerId | string | Customer identifier of your system/app. For example, if you are using Shopify, it will be sShopify customer id. |
| timestamp | string | Unix timestamp in milliseconds. Required, 13 digits. |
| info | array | List of customer attributes. The detailed structure of the array is mentioned below seperetely. |
{% tabs %}
{% tab title="200 Success. Customer details saved successfully." %}
```javascript
{ success: true }
```
{% endtab %}
{% tab title="422 Invalid input. Request payload is not in valid format." %}
```javascript
{
"type": "ValidationError",
"details": [
{
"message": "type is required",
"path": [
"type"
],
"type": "any.required",
"context": {
"key": "type",
"label": "type"
}
}
]
}
```
{% endtab %}
{% endtabs %}
A sample structure of the info object for identifying customers is mentioned below.
{% tabs %}
{% tab title="Structure of Info object in request body" %}
```javascript
info: [
{
"name": Required, Max 120 characters
"value": Required, null allowed, Max 100 characters
"type": Required, Allowed: 'integer', 'float', 'double', 'long', 'boolean', 'date', 'string'
}
]
```
{% endtab %}
{% tab title="Example of info object" %}
```javascript
info: [
{ name: 'name', type: 'string', value: '-My-Name-' },
{ name: 'email', type: 'string', value: 'myemail@gmail.com' },
{ name: 'mobile', type: 'string', value: 9876543210 },
{ name: 'Department', type: 'string', value: 'Test Department' },
{ name: 'Test Number', type: 'integer', value: 72305 },
{ name: 'Test Float', type: 'float', value: 7230554.345 },
{ name: 'Test Double', type: 'double', value: 723055465462.345 },
{ name: 'Test Long', type: 'long', value: 723055465462345678 },
{ name: 'Test Boolean', type: 'boolean', value: true },
{ name: 'Test Date', type: 'date', value: '2020-01-01 05:05:05' }
]
```
{% endtab %}
{% endtabs %}
## Customer Logout API
Call this API when a customer logs out of the app. Make sure after the logout API is successful, you need to generate a new device id by calling AppLaunched API.
## Logout User
`POST` `https://dc.growlytics.in/logout`
#### Request Body
| Name | Type | Description |
| ------------------------------------- | ------ | -------------------- |
| did\* | String | Device id. Required. |
{% tabs %}
{% tab title="200: OK " %}
```javascript
{
// Response
}
```
{% endtab %}
{% endtabs %}
## Save Mobile Push Token API
Call this API when customer subscribes to push notifications. You will need to pass the device id which you have got in the app launch API response.
## Save Mobile Push Token
`POST` `https://dc.growlytics.in/mpush_token`
Use this API to save the mobile push firebase token
#### Headers
| Name | Type | Description |
| ---------------- | ------ | ------------------- |
| x-growlytics-key | string | Growlytics API key. |
#### Request Body
| Name | Type | Description |
| --------- | ------ | ---------------------------------------------------- |
| did | string | Device id. Required. |
| type | string | Type of token. Valid values are "fcm" and "apns". |
| token | string | FCM or APNS Token |
| timestamp | number | Unix timestamp in milliseconds. Required, 13 digits. |
{% tabs %}
{% tab title="200 Success. Mobile push token saved successfully." %}
```javascript
{ success: true }
```
{% endtab %}
{% tab title="422 Invalid Input. Request body is not in acceptable format." %}
{% code title="Example Of Invalid Input JSON" %}
```javascript
{
"type": "ValidationError",
"details": [
{
"message": "type is required",
"path": [
"type"
],
"type": "any.required",
"context": {
"key": "type",
"label": "type"
}
}
]
}
```
{% endcode %}
{% endtab %}
{% endtabs %}
# Coupon Webhook
This article describes how you can integrate coupon webhooks to receive coupon creation requests generated from Growlytics.
## Introduction
You can use webhook subscriptions to receive coupon creation notifications when coupon is generated for a given customer by Growlytics. After you've subscribed to coupon creation webhook, you can let your app execute code immediately after for given coupon.
### Considerations
* Coupon webhook is a POST request. All the data will be passed in JSON format in the HTTP post body.
* With each webhook request, you will receive customer id, coupon id (of Growlytics), and discount rules that you have specified in Growlytics dashboard.
| Webhook Property | Data Type | Description |
| ----------------- | --------------- | ----------------------------------------------------------------------------------------------------------------------------------------------------------------------------------------------------------------------- |
| id | string | Growlytics Coupon id |
| customerId | string | Customer id of your system, if customer is identified. If coupon is sent and customer is not identified, this field will remain null. |
| code | string | Coupon code sent to customer. |
| name | string | Coupon name specified in growlytics. |
| couponType | string | 'fixedAmount' or 'percentage' or 'freeShipping' |
| discountValue | number | If coupon type is "fixedAmount", then this value represents amount of discount. If coupon type is "percentage", this value will be percentage of discount. If coupon type is "freeShipping", you can ignore this field. |
| applicableOn | string | "Order" if discount is on entire order. "product" if discount to be applied on specific products. "collection" if discount to be applied on specific collections. |
| applicableFilters | Array Of String | If applicableOn is "product", this field will be array of products. If applicableOn is "collection", this field will be array of collections. For rest, you can ignore this field. |
| minOrderAmount | number | Minimum order amount for discount to be applicable. |
| usageLimitType | string | "once" or "multiple" |
| expiryType | string | "relative" or "date". Right now only relative is supported by Growlytics. "date" is coming soon. |
| expiryUnit | string | Unit of expiry. It will be one of "hour" or "day". |
| expiryValue | number | number of hours or days. Depending on expiryUnit specified. |
## Webhook Examples
Let's take a few examples and understand what input you will get in http call for different scenarios.
### Example 1: $100 off on entire order, if order amount is greater than $1500, coupon expires in 15 days
{% code title="JSON IN HTTP POST BODY" %}
```javascript
{
// General props
"id": "coupon-id",
"customerId": "customer-id",
"name": "coupon-name",
"code": "coupon-code",
// Rules
"couponType": "fixedAmount", // Fixed Amount Discount on Entire Order
"discountValue": 100, // $100 Off
"applicableOn": "order", // Apply discount on entier order
"applicableFilters": null, // not applicable
"usageLimitType": "once", // Customer can use this coupon only once
"minOrderAmount": 1500, // coupon will be only applicable if amount > 100
// Expiry Settings
"expiryType": "relative", // Expiry relative to when coupon is generated
"expiryValue": 15, // # of hours
"expiryUnit": "day" // Expiry in days (you can mention hours or days)
}
```
{% endcode %}
### Example 2: 10% OFF on selected products, If order amount is greater than 10k, coupon expires in 48 hours
{% code title="JSON IN HTTP POST BODY" %}
```javascript
{
// General props
"id": "coupon-id",
"customerId": "customer-id",
"name": "coupon-name",
"code": "coupon-code",
// Rules
"couponType": "percentage", // Discount in percentage
"discountValue": 10, // 10% off
"applicableOn": "prdouct", // Apply discount on specific products
"applicableFilters": ['a','b'],// List of prdouct ids on which discounts are applicable
"usageLimitType": "once", // Customer can use this coupon only once
"minOrderAmount": 10000, // coupon will be only applicable if amount > 100
// Expiry Settings
"expiryType": "relative", // Expiry relative to when coupon is generated
"expiryValue": 48, // # of hours
"expiryUnit": "hour" // Expiry in hours (you can mention hours or days)
}
```
{% endcode %}
### Example 3: Free Shipping, If order amount is greater than 10k and shipping amount is more than $500, coupon expires in 48 hours
{% code title="JSON IN HTTP POST BODY" %}
```javascript
{
// General props
"id": "coupon-id",
"customerId": "customer-id",
"name": "coupon-name",
"code": "coupon-code",
// Rules
"couponType": "freeShipping", // Discount in percentage
"discountValue": '', // Not applicable
"applicableOn": "order", // Not Applicable
"applicableFilters": null, // Not Applicable
"usageLimitType": "once", // Customer can use this coupon only once
"minOrderAmount": 500, // coupon will be only applicable if amount > 100
// Expiry Settings
"expiryType": "relative", // Expiry relative to when coupon is generated
"expiryValue": 48, // # of hours
"expiryUnit": "hour" // Expiry in hours (you can mention hours or days)
}
```
{% endcode %}
# Connector Webhooks
This article describes how you report campaign open and click activities for the custom channel campaign.
Custom Connector Campaign is an API based solution from Growlytics to send campaign messages to your communication vendors which are not registered with Growlytics. With these vendors, you can send messages via API calls. When the campaign is sent, Growlytics will call API endpoints mentioned in the campaign content.
This article will explain how you can report open and click events for the connector campaign messages.
## How does it work?
When Growlytics calls the API endpoint for the connector campaign message, Growlytics includes a custom header `x-growlytics-token` which you can use to report open/click of the message.
## Api For Reporting Opens/Clicks
## Use this end point to repor to report opens/clicks to Growlytics.
`POST` `https://cts.growlytics.in/custom-connector/production/`
#### Request Body
| Name | Type | Description |
| ---------------------------------------- | ------ | -------------------------------------------------------------------- |
| token\* | String | Growlytics token which you might have received on your api endpoint. |
| action\* | String | Allowed: open, click. |